

Hello and welcome to my personal guide to the Eorzea Café! There are a few other English guides out there, however I wanted to provide my own with personal advice from my well over a dozen visits. So let’s get started, shall we?
→Menu Guide & Recommendations← [Last Update: Feb. 2019]

Reservation
Riiko here made a good guide for the website and pick-up (which you can read [here]), so I’ll be covering how to get tickets from the Loppi machine itself instead. Some people may also have trouble with O-tike not taking their credit cards, which this method gets around. Additionally, you can select “店頭支払” (pay in-store) if you wish to try and get the ticket in advance, however do note you will only have about 3 days after reserving to pay and pick them up.
So, to find the café on the machine, we need either the L-code or a QR code. From a PC we can only get the L-code, but from mobile we can get both.
On PC


We follow similar steps to Riiko’s guide to get to the page, finding the correct date and location. When we get to the page, we find the portion labeled “Lコード” and write it down. I’ve gone and filtered it since it changes based on the dates, and this will likely not be the one you need.
On Mobile


(click for larger images)
Once again, we follow similar steps, here however we find the text “Loppi” and tap “Loppi専用コードはこちら” or scroll down to find the QR. I recommend screencapping the QR so you don’t have to worry about hooking up to the conbini wifi. Again I filtered the code so people don’t try to use it and wonder why it’s not working.
As a note on locations, while at most times only Akihabara/Tokyo (東京) and Osaka (大阪) will be listed, during the summer time you will spot a third: Yokohama (横浜). Yokohama is only about a few hours by train from Tokyo if you’re staying in Japan and I do very much recommend trying to hit both it and Akihabara if you’re staying long enough. If your timing is good, you might even be able to go to the Pikachu Outbreak event that happens every year down there!
Now that we’ve got our code, we’re off to the Lawson!

This is the sort of thing you should look for when it comes to spotting a Lawson. They are very common though, I promise! This is one of my local Lawsons so it might look a little different than the ones in the city itself, but the blue and pink stripes will be on every single one (except the “Natural” Lawsons, which I don’t know if they have the Loppi machines).

Next up, we find the bright red Loppi machine. It’s really hard to miss, but if you can’t seem to find it, just saying “Loppi machine?” or “Loppi machine doko [where]?” to the staff should likely get them to help you find it.
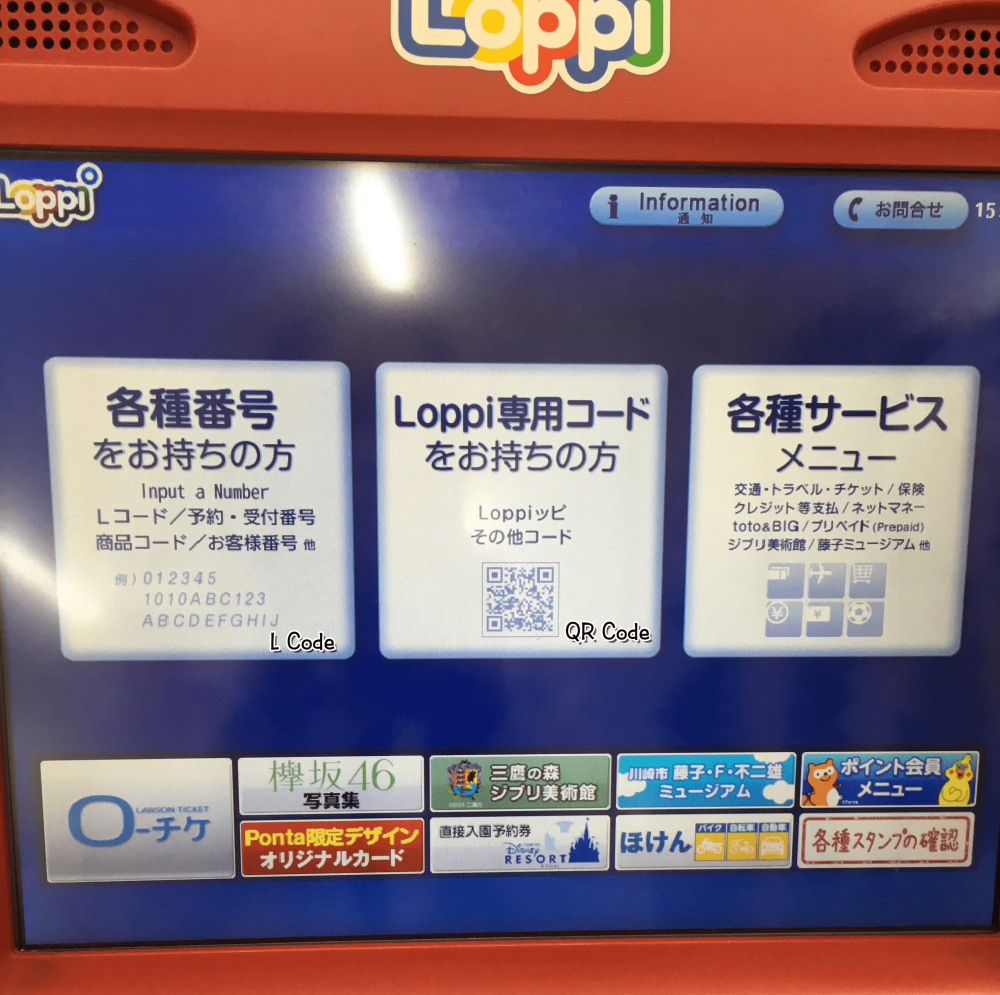
If we’ve got an L-code, we press the left-most button, if we’ve got a QR we press the middle button. You then either scan the QR or input the code. Hit the orange “next” button to move on.

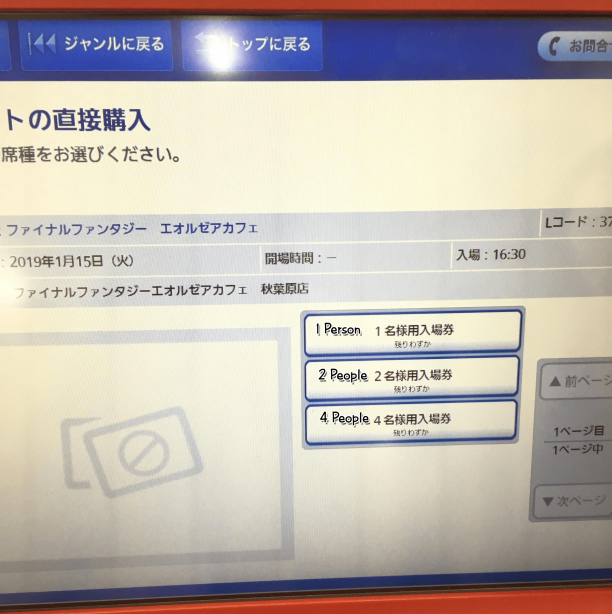
Next, we confirm this is what we want (make sure it says エオルゼアカフェ [Eorzea Café] and the correct location!), we tap a date, select a time slot, and how many people. ✕ means it’s full, △ means nearly full, and O means almost no reservations. You must reserve at least 2 days in advance. As a note, weekdays (excluding the 7pm/19:00 slot and holidays) are your best bet for short-notice reservations. Weekends will be harder to get, and holidays can be downright impossible. On top of around Christmas, Japan has two other week-ish long vacation times that will be difficult to reserve during: Obon (mid-August) and Golden Week (early April). Do take those into consideration!
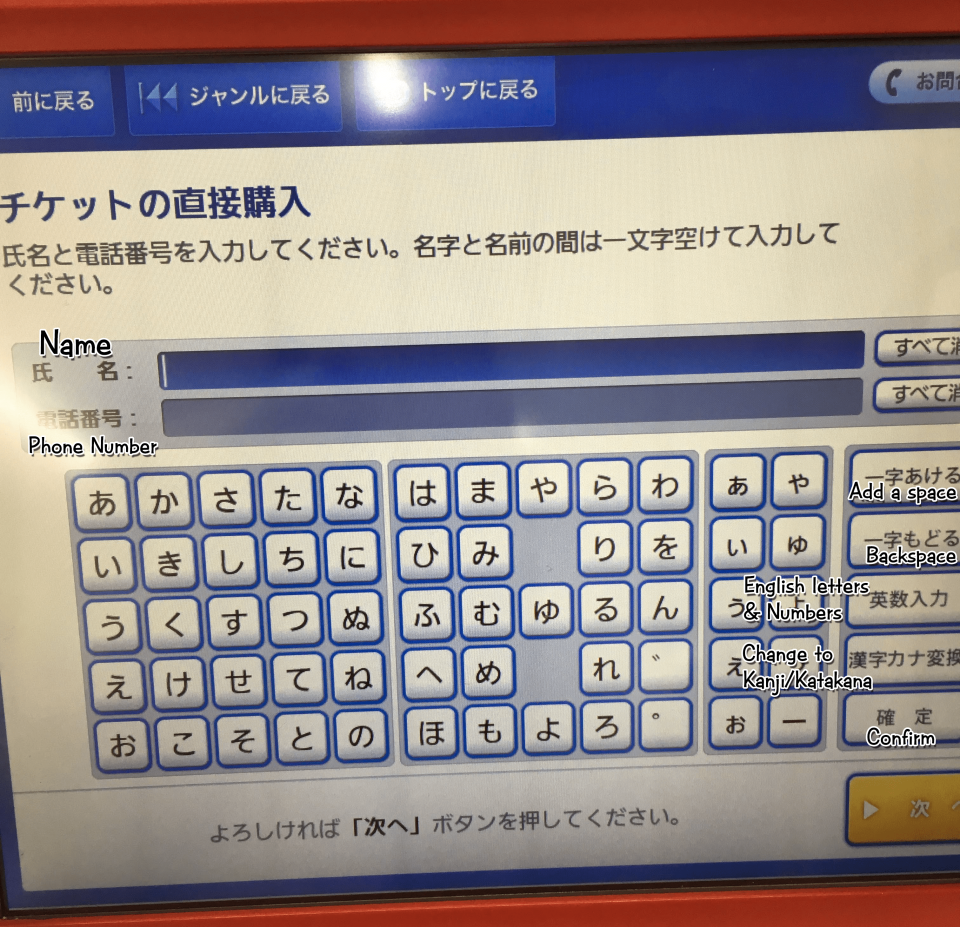
Next we input our name, in katakana, and a phone number (hotel’s will do).
Finally, there’s a screen about the Ponta card, which you can tap “✖ いいえ” (no) to. One final confirmation, and then it’ll print this loooong receipt to bring to the staff. You have 30 minutes before it will expire, so do keep that in mind if you want to pick up anything else. When you go to pay, you’ll be asked to sign the paper. Technically you’re supposed to sign in Japanese, but I’ve signed both in Japanese and in English (aka: scribble) and not had any real problem. After paying, the staff will go and get your printed tickets, confirm they’re the right thing, and then place them in a ticket holder for you to take.
And with that, you’re all set to go to the café!

Directions
From Akihabara station, you’ll head to the Electric Town (電気街) exit. You’ll find yourself facing an atré, at which turn left. There will be a big red SEGA game center right outside the station, which you should walk past (with it on your right) to the corner. Turn right at that corner, and continue down that way until you reach a very large crosswalk. You’ll see the Pasela Resorts building from here and you’ll have to cross twice to get to it.


(click for bigger pictures)
Note!! There are two Pasela Resorts buildings in Akihabara, so make sure to go to this one, across from the Big Apple pachinko parlor. The other, however, does host the special FFXIV karaoke room, so if you’ve got a group that likes that sort of thing you can take a swing over there as well! I’ve never been though, so I have no real information on that end (if or when that changes, I’ll try to write about it). The website for that building can be found [here]. They do feature some other themed rooms as well such as Monster Hunter, Evangelion, etc.

Café Rules
Now that we’re at the building, we’ll head up to the second floor. As a note, due to how they’ve moved the merchandise shelves to the second floor, one elevator doesn’t open on the second floor, but I can’t for the life of me remember which one it is as I tend to take the stairs. About 15 minutes before start time, they will take tickets and line people up outside.
With a reservation, you will be able to choose one reservation-only coaster featuring the key art for the jobs. Here’s a little chart of the Japanese names if you wish to try and say your choice in Japanese! That said, pointing to their chart and even using the English name they should understand, so don’t worry.
| English | Japanese | Shortened |
|---|---|---|
| Warrior | 戦士 (senshi) | |
| Paladin | ナイト (naito) | |
| Dark Knight | 暗黒騎士 (ankokukishi) | 暗黒 (ankoku) |
| White Mage | 白魔導士 (shiromadoushi) | 白魔 (shiroma) |
| Scholar | 学者 (gakusha) | |
| Astrologian | 占星術師 (senseijutsushi) | 占星 (sensei) |
| Black Mage | 黒魔道士 (kuromadoushi) | 黒魔 (kuroma) |
| Summoner | 召喚士 (shoukanshi) | 召喚 (shoukan) |
| Red Mage | 赤魔道士 (akamadoushi) | 赤魔 (akama) |
| Bard | 吟遊詩人 (gin’yuushijin) | 吟遊 (gin’yuu) |
| Machinist | 機工士 (kikoushi) | 機工 (kikou) |
| Monk | モンク (monku) | |
| Dragoon | 竜騎士 (ryuukishi) | 竜 (ryuu) |
| Ninja | 忍者 (ninja) | |
| Samurai | 侍 (samurai) |
They will show you and confirm your coaster selection, and then hand you three more things: your tablet menu, a jumbo cactpot ticket, and an order sheet for your service drink. If you ask (or look foreign enough), you can also receive a laminated set of sheets as a guide in English.
The service drink order sheet will be entirely in Japanese, however if you can’t read it, you can look at your menu (which features many pictures, but I’ll also cover some in detail in part two) and cross reference the names to each other. Alternatively, you can likely ask the staff, pointing to the drink(s) you want on the tablet menu or something like that. Mark how many you want (the total drinks should be equal to the number of people your ticket(s) were for), and hand it to the staff. They’ll confirm and move on until it’s time to go in.
Once it’s time to go in, they will give a little spiel about the rules. Here’s a quick run down of the important parts:
- No Smoking
- There’s no bathroom inside the café, instead you go out and turn right in the hallway
- Screenshots (pictures) are permitted, however video recording is not
- Wait at the entrance area for the staff to seat you (this is a semi-recent change)
- Stay seated until after the opening spiel
Once you’re in and seated, under your chair will be a bin your can place your bags and such inside. After everyone is seated, the host(ess) will begin the welcoming spiel. Make sure to give them a good “konnichiwa” (good afternoon) or “konbanwa” (good evening) depending on the time! They will then explain the jumbo cactpot, which has three prizes. Third place is a small Senor Sabotender button, second is a “placemat” (aka: poster) featuring the Gold Saucer artwork, and first is a GIANT honey toast dessert, featured below.

If you win the dessert, be warned. It is huge and incredibly filling. Oh, and extremely sweet. That said, they’ve now made it possible to pass on the dessert and receive a little ticket instead. You can keep the ticket and never use it if you please, but the dessert is something to behold and honestly pretty good. You just have to prepare your gut for it.
Finally, they also mention a few items that are large and/or take a long time to make, and strongly recommend ordering them sooner rather than later. The dishes mentioned are the following (as of Jan. 2019):
- The Bull Bowl of Ala Mhigo (アラミゴの猛牛丼)
- Yotsuyu’s Tyranny ~Red and Black Soft Tofu Stew~ (ヨツユの圧政~赤と黒の純豆腐~)
- Raid Parfait: Alexsundae (レイドパフェ・機工城アレキサンデー)
As a note, you can order during the spiel (I’ve done it as have others) if you know for sure what food you want and to be honest I somewhat recommend it if you’ve decided. I tend to be pretty hungry when I arrive so I want my food ASAP.
Speaking of the food, onward to part two: the menu!


One thought on “Mimi’s Guide to the Eorzea Café – Reservations”